ساخت اپلیکیشن چت برای iOS با SwiftUI — از صفر تا صد
در این راهنما با روش عملی ساخت اپلیکیشن چت برای iOS با SwiftUI آشنا خواهیم شد. SwiftUI یک فریمورک جدید است که از سوی اپل برای توسعه دهنگان سوئیفت معرفی شده است و با این که به دلیل نوظهور بودن همچنان با مشکلاتی دست به گریبان است، اما استفاده از آن مزیتهایی نیز دارد. برای نمونه نوشتن کد در این محیط نسبت به نوشتن در محیطهای دیگر، سبب میشود تا حجم کدهای تولید شده ۵ بار کمتر شود. با ما همراه باشید تا یک اپلیکیشن چت iOS با هم بسازیم.
دانلود و نصب +Xcode 11
قبل از هر چیز باید آخرین نسخه از نرمافزار Xcode را از اپاستور (+) دانلود کنیم.
دریافت macOS Catalina
برای دسترسی به قابلیت جذاب پیشنمایش در فریمورک SwiftUI باید جدیدترین نسخه از سیستم عامل مک یعنی نسخه Catalina را نصب کنید. به این منظور کافی است عبارت Catalina را در اپاستور جستجو کرده و آن را نصب کنید.
نصب نسخه جدید مک پس از دانلود آن ممکن است بین 40 تا 60 دقیقه از شما زمان بگیرد.
ایجاد پروژه جدید در Xcode
نرمافزار Xcode را باز کنید و پروژه جدیدی بسازید.
در پنجرهای که باز میشود، گزینه Single View App را انتخاب کرده و روی Next کلیک کنید.
یک نام جذاب مانند SwiftUI Chat برای اپلیکیشن خود انتخاب کنید. تیم خود را نیز انتخاب کرده و مطمئن شوید که گزینه Use SwiftUI انتخاب شده است. سپس روی Next کلیک کنید. هر پوشهای که میخواهید پروژه در آن ذخیره شود را انتخاب کرده و سپس روی Create کلیک کنید.
ساخت نخستین نما در SwiftUI
در این راهنما منظور از «نِما» همان View است. هنگامی که پروژه جدید را ایجاد کردید، یک ساختار کاملاً جدید در کد میبینید. از دیدن این ساختار ناشناخته نگران نشوید، زمانی که با آن آشنا شوید، میتوانید از آن در هر کجا استفاده کنید. منظور ما از هر کجا پلتفرمهای iOS ،iPad OS ،watchOS و حتی MacOS است.
جدیدترین قابلیتهای عرضه شده در کنفرانس WWDC2019 نشان میدهد که اگر یک اپلیکیشن را برای iOS بسازید، میتوانید آن را به سادگی و بدون هیچ دانش اضافی به هر پلتفرم دیگر اپل نیز تبدیل کنید.
اینک درون پروژه جدید Xcode قرار دارید و کد نمونهای که در زمان ساخت اپلیکیشن تولید شده را میبینید. اگر دکمه Resume را در گوشه راست-بالای صفحه میبینید، روی آن کلیک کنید تا صفحه گوشی iPhone X در سمت راست ظاهر شود. سپس تلاش کنید عبارت Hello World! را در ادیتور متی به هر رشته دیگری که دوست دارید عوض کنید.
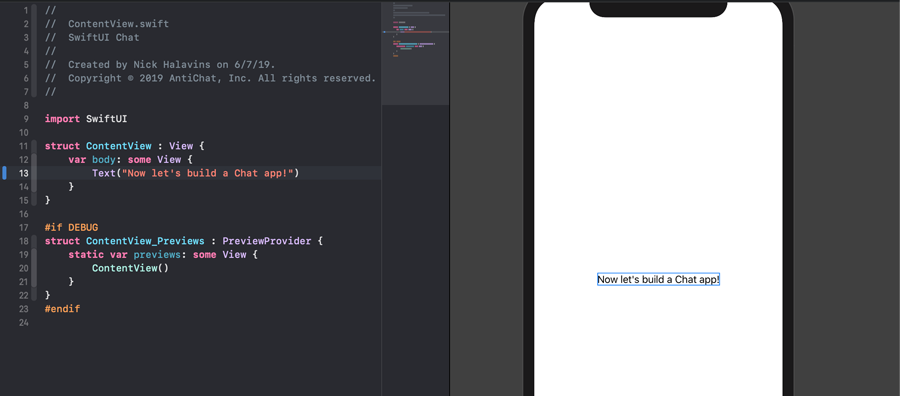
همان طور که میبینید تغییرات بیدرنگ در سمت راست و روی صفحه گوشی بازتاب مییابند. در جدیدترین نسخه SwiftUI دیگر نیازی به کامپایل کد به روش سنتی وجود ندارد. میتوانید هر چیزی که دوست دارید را بنویسد و تغییرات بیدرنگ اعمال میشوند. همچنین میتوانید تغییراتی در interface builder ایجاد کنید تا کد به صورت خودکار تغییر پیدا کند.
بدین ترتیب ساخت اپلیکیشن در SwiftUI بیشتر شبیه به ساخت صفحههای وبسایت با استفاده از ادیتورهای HTML در حدود سالهای 2000 شبیه شده است.
افزودن نخستین پیام به نما
در این بخش پیامهایی به نمای خود اضافه میکنیم. کد موجود را با کد زیر عوض کنید و کامنت های آن را با دقت بخوانید.
1//
2// ContentView.swift
3// SwiftUI Chat
4//
5// Created by Nick Halavins on 6/7/19. Updated 10/11/19
6// Copyright © 2019 AntiLand. All rights reserved.
7//
8import SwiftUI
9
10// let's create a structure that will represent each message in chat
11struct ChatMessage : Hashable {
12 var message: String
13 var avatar: String
14}
15
16struct ContentView : View {
17
18 // let's add some dummy values to the messages
19 // suppose, there are only two messages in the chat room sent by two users: A and B
20 // A sent "Hello world" with a red message bubble color
21 // B sent "Hi" with a blue message color
22 var messages = [
23 ChatMessage(message: "Hello world", avatar: "A"),
24 ChatMessage(message: "Hi", avatar: "B")
25 ]
26
27 var body: some View {
28
29 // I've removed the text line from here and replaced it with a list
30 // List is the way you should create any list in SwiftUI
31 List {
32 // we have several messages so we use the For Loop
33 ForEach(messages, id: \.self) { msg in
34 Group {
35 Text(msg.avatar)
36 Text(msg.message)
37 // then we just show the avatars of the users and their messages
38 // by using these two Text functions
39 }
40 }
41 }
42 }
43}
44
45#if DEBUG
46struct ContentView_Previews : PreviewProvider {
47 static var previews: some View {
48 ContentView()
49 }
50}
51#endif
اینک چه میبینید؟
اکنون پیامهایی داریم که روی صفحه نمایش مییابند. توجه کنید که ما مجبور به ساخت UITableViews و سرو کله زدن با IndexPaths نیستیم. تنها کاری که باید انجام دهیم، ایجاد یک List با یک حلقه For است.
افزودن طراحی لیست پیامها
اکنون کاری میکنیم که این پیامها شبیه اپلیکیشنهای چت ظاهر شوند. به این منظور باید یک متغیر به نام color به struct به نام ChatMessage اضافه کنیم:
1struct ChatMessage : Hashable {
2var message: String
3var avatar: String
4var color: Color
5}
سپس باید لیست پیامها را با پارامتر رنگ پر کنیم:
1var messages = [
2ChatMessage(message: “Hello world”, avatar: “A”, color: .red),
3ChatMessage(message: “Hi”, avatar: “B”, color: .blue)
4]
در این مرحله متنها را در لیست استایلبندی میکنیم:
1List {
2 ForEach(messages, id: \.self) { msg in
3 Group {
4 Text(msg.avatar)
5 Text(msg.message)
6 .bold()
7 .foregroundColor(Color.white)
8 .padding(10)
9 .background(msg.color)
10 .cornerRadius(10)
11 }
12 }
13}
در حال حاضر کاری با آواتار نداریم، بلکه میخواهیم پیامها مانند حبابهای پیام واقعی به نظر برسند. بنابراین از تابعهای جدیدی برای ساختاربندی متن استفاده میکنیم. بقیه کار را SwiftUI به صورت خودکار مدیریت میکند. SwiftUI همه کدها را به زبان سوئیفت ترجمه میکند. همچنین همه نماهای مورد نیاز را پیرامون این بلوکهای متنی ایجاد میکند. لازم نیست در مورد آن نگرانی داشته باشید.
بدین ترتیب ما موفق شدیم با نوشتن چند خط کد، حبابهای متنی را در اپلیکیشن iOS ایجاد کنیم.
اینک آواتارها را در یک خط با پیامها قرار میدهیم. برای این که محتوای حلقه for بیش از حد شلوغ نشود، از مزیت فرمت بندی کد در SwiftUI بهره میگیریم. ساختار جدیدی میسازیم و متن را در آن قرار میدهیم:
1// ChatRow will be a view similar to a Cell in standard Swift
2struct ChatRow : View {
3
4 // we will need to access and represent the chatMessages here
5 var chatMessage: ChatMessage
6
7 // body - is the body of the view, just like the body of the first view we created when opened the project
8 var body: some View {
9 // HStack - is a horizontal stack. We let the SwiftUI know that we need to place
10 // all the following contents horizontally one after another
11 HStack {
12 Group {
13 Text(chatMessage.avatar)
14 Text(chatMessage.message)
15 .bold()
16 .padding(10)
17 .foregroundColor(Color.white)
18 .background(chatMessage.color)
19 .cornerRadius(10)
20 }
21 }
22 }
23}
فراموش نکنید که ChatRow را در حلقه For قرار دهید:
1ForEach(messages, id: \.self) { msg in
2 ChatRow(chatMessage: msg)
3}
در خروجی تصویر زیر را میبینیم:
میتوانید با آواتارها کار کنید و آنها را بنا به میل خود استایلبندی کنید.
تا اینجا با روش نمایش پیامها از دیکشنری پیامها آشنا شدیم. اما میخواهیم پیامها را از جاهای دیگری مانند فایل استاندارد سوئیفت نیز بگیریم. بخش شبکه را با استفاده از کتابخانههای رایج و فریمورکها مدیریت میکنیم. قبل از هر چیز یک فایل استاندارد سوئیفت بدون پشتیبانی از SwiftUI بسازید:
نام آن را ChatController.swift گذاشته و آن را در پوشه Chat SwiftUI قرار دهید. از این فایل به عنوان پلی بین یک کد قدیمی سوئیفت و کد جدید نوشته در SwiftUI استفاده میکنیم. این بدان معنی است که میتوانیم از فایل ChatController برای اتصال به پایگاه داده برای مثال با استفاده از Google FireBase بهره بگیریم. سپس دادهها را استخراج کرده و به نمای SwiftUI ارسال میکنیم. برای این که این کد کار کند، باید هر دو فریمورک Combine و SwiftUI را ایمپورت کنیم.
1//
2// ChatController.swift
3// SwiftUI Chat
4//
5// Created by Nick Halavins on 6/7/19. Updated 10/11/19
6// Copyright © 2019 AntiLand. All rights reserved.
7//
8import Combine
9import SwiftUI
10
11// ChatController needs to be a ObservableObject in order
12// to be accessible by SwiftUI
13class ChatController : ObservableObject {
14 // didChange will let the SwiftUI know that some changes have happened in this object
15 // and we need to rebuild all the views related to that object
16 var didChange = PassthroughSubject<Void, Never>()
17
18 // We've relocated the messages from the main SwiftUI View. Now, if you wish, you can handle the networking part here and populate this array with any data from your database. If you do so, please share your code and let's build the first global open-source chat app in SwiftUI together
19 // It has to be @Published in order for the new updated values to be accessible from the ContentView Controller
20 @Published var messages = [
21 ChatMessage(message: "Hello world", avatar: "A", color: .red),
22 ChatMessage(message: "Hi", avatar: "B", color: .blue)
23 ]
24
25 // this function will be accessible from SwiftUI main view
26 // here you can add the necessary code to send your messages not only to the SwiftUI view, but also to the database so that other users of the app would be able to see it
27 func sendMessage(_ chatMessage: ChatMessage) {
28 // here we populate the messages array
29 messages.append(chatMessage)
30 // here we let the SwiftUI know that we need to rebuild the views
31 didChange.send(())
32 }
33
34}
برای این که SwiftUI بتواند کنترلر جدید را ببینید، باید آن را به فایل SceneDelegate.swift نیز اضافه کنیم. ابتدا chatController را به عنوان یک متغیر زیر متغیر window اضافه میکنیم:
1var window: UIWindow?
2var chatController = ChatController()
سپس یک شیء environment به پنجره اصلی در تابع scene اضافه میکنیم:
1let window = UIWindow(frame: UIScreen.main.bounds)
2window.rootViewController = UIHostingController(rootView: ContentView().environmentObject(chatController))
3self.window = window
در فایل نمای اصلی SwiftUI که ContentView.swift نام دارد نیز باید این environmentObject جدید را اضافه کنیم تا برای پیشنمایش قابل دسترس باشد:
1#if DEBUG
2struct ContentView_Previews : PreviewProvider {
3 static var previews: some View {
4 ContentView()
5 .environmentObject(ChatController())
6 }
7}
8#endif
افزودن TextField و یک Button برای ارسال پیام در SwiftUI
اینک تقریباً به انتهای کار نزدیک شدهایم. در این مرحله باید یک TextField و یک Button نیز برای ارسال پیامها به اپلیکیشن خود اضافه کنیم. نسخه کنونی فایل ContentView.swift را به صورت زیر تغییر دهید:
1//
2// ContentView.swift
3// SwiftUI Chat
4//
5// Created by Nick Halavins on 6/7/19. Updated 10/11/19
6// Copyright © 2019 AntiLand. All rights reserved.
7//
8import SwiftUI
9
10// let's create a structure that will represent each message in chat
11struct ChatMessage : Hashable {
12 var message: String
13 var avatar: String
14 var color: Color
15 // isMe will be true if We sent the message
16 var isMe: Bool = false
17}
18
19// ChatRow will be a view similar to a Cell in standard Swift
20struct ChatRow : View {
21 // we will need to access and represent the chatMessages here
22 var chatMessage: ChatMessage
23 // body - is the body of the view, just like the body of the first view we created when opened the project
24 var body: some View {
25 // HStack - is a horizontal stack. We let the SwiftUI know that we need to place
26 // all the following contents horizontally one after another
27 Group {
28 if !chatMessage.isMe {
29 HStack {
30 Group {
31 Text(chatMessage.avatar)
32 Text(chatMessage.message)
33 .bold()
34 .padding(10)
35 .foregroundColor(Color.white)
36 .background(chatMessage.color)
37 .cornerRadius(10)
38 }
39 }
40 } else {
41 HStack {
42 Group {
43 Spacer()
44 Text(chatMessage.message)
45 .bold()
46 .foregroundColor(Color.white)
47 .padding(10)
48 .background(chatMessage.color)
49 .cornerRadius(10)
50 Text(chatMessage.avatar)
51 }
52 }
53 }
54 }
55
56 }
57}
58
59struct ContentView : View {
60
61 // @State here is necessary to make the composedMessage variable accessible from different views
62 @State var composedMessage: String = ""
63 @EnvironmentObject var chatController: ChatController
64
65 var body: some View {
66
67 // the VStack is a vertical stack where we place all our substacks like the List and the TextField
68 VStack {
69 // I've removed the text line from here and replaced it with a list
70 // List is the way you should create any list in SwiftUI
71 List {
72 // we have several messages so we use the For Loop
73 ForEach(chatController.messages, id: \.self) { msg in
74 ChatRow(chatMessage: msg)
75 }
76 }
77
78 // TextField are aligned with the Send Button in the same line so we put them in HStack
79 HStack {
80 // this textField generates the value for the composedMessage @State var
81 TextField("Message...", text: $composedMessage).frame(minHeight: CGFloat(30))
82 // the button triggers the sendMessage() function written in the end of current View
83 Button(action: sendMessage) {
84 Text("Send")
85 }
86 }.frame(minHeight: CGFloat(50)).padding()
87 // that's the height of the HStack
88 }
89 }
90 func sendMessage() {
91 chatController.sendMessage(ChatMessage(message: composedMessage, avatar: "C", color: .green, isMe: true))
92 composedMessage = ""
93 }
94}
95
96#if DEBUG
97struct ContentView_Previews : PreviewProvider {
98 static var previews: some View {
99 ContentView()
100 .environmentObject(ChatController())
101 }
102}
103#endif
نسخه نهایی فایل chatController.swift تغییری نیافته است. نسخه نهایی SceneDelegate.swift به صورت زیر است:
1//
2// SceneDelegate.swift
3// SwiftUI Chat App
4//
5// Created by Nick Halavins on 10/11/19.
6// Copyright © 2019 AntiChat, Inc. All rights reserved.
7//
8import UIKit
9import SwiftUI
10
11class SceneDelegate: UIResponder, UIWindowSceneDelegate {
12
13 var window: UIWindow?
14 var chatController = ChatController()
15
16 func scene(_ scene: UIScene, willConnectTo session: UISceneSession, options connectionOptions: UIScene.ConnectionOptions) {
17 // Use this method to optionally configure and attach the UIWindow `window` to the provided UIWindowScene `scene`.
18 // If using a storyboard, the `window` property will automatically be initialized and attached to the scene.
19 // This delegate does not imply the connecting scene or session are new (see `application:configurationForConnectingSceneSession` instead).
20 // Create the SwiftUI view that provides the window contents.
21 let contentView = ContentView()
22
23 // Use a UIHostingController as window root view controller.
24 if let windowScene = scene as? UIWindowScene {
25 let window = UIWindow(windowScene: windowScene)
26 window.rootViewController = UIHostingController(rootView: contentView.environmentObject(chatController))
27 self.window = window
28 window.makeKeyAndVisible()
29 }
30 }
31
32 func sceneDidDisconnect(_ scene: UIScene) {
33 // Called as the scene is being released by the system.
34 // This occurs shortly after the scene enters the background, or when its session is discarded.
35 // Release any resources associated with this scene that can be re-created the next time the scene connects.
36 // The scene may re-connect later, as its session was not neccessarily discarded (see `application:didDiscardSceneSessions` instead).
37 }
38
39 func sceneDidBecomeActive(_ scene: UIScene) {
40 // Called when the scene has moved from an inactive state to an active state.
41 // Use this method to restart any tasks that were paused (or not yet started) when the scene was inactive.
42 }
43
44 func sceneWillResignActive(_ scene: UIScene) {
45 // Called when the scene will move from an active state to an inactive state.
46 // This may occur due to temporary interruptions (ex. an incoming phone call).
47 }
48
49 func sceneWillEnterForeground(_ scene: UIScene) {
50 // Called as the scene transitions from the background to the foreground.
51 // Use this method to undo the changes made on entering the background.
52 }
53
54 func sceneDidEnterBackground(_ scene: UIScene) {
55 // Called as the scene transitions from the foreground to the background.
56 // Use this method to save data, release shared resources, and store enough scene-specific state information
57 // to restore the scene back to its current state.
58 }
59
60
61}
برای این که این کد کار کند، باید اپلیکیشن را روی شبیهساز iOS اجرا کنید:
سپس هر دو پیام را از ChatController به همراه TextField جدید و دکمه Send خواهید دید. برای ارسال یک پیام در TextField کلیک میکنیم و سپس کلیدهای Cmd+K را برای نمایش کیبورد میزنیم. دلیل این کار آن است که Xcode جدید باگهایی برای کار با کیبورد فیزیکی دارد و باید کیبورد نرمافزاری را فعال کنیم.
عبارت را تایپ کرده و دوباره روی کلیدهای Cmd+K بزنید تا کیبورد شبیهساز پنهان شود و سپس دکمه Send را بزنید.
سخن پایانی
SwiftUI یک فریمورک کاملاً جدید است که به شما کمک میکند تا قابلیتهای جدیدی خلق کرده و کد کمتری بنویسید. در هر حال این فریمورک همچنان تازه است و مستندات زیادی در مورد چگونگی انجام کارهای مختلف وجود ندارد. سورس کد این پروژه را میتوانید از این ریپوی گیتهاب (+) دانلود کنید.
اگر این مطلب برای شما مفید بوده است، آموزشهای زیر نیز به شما پیشنهاد میشوند:
- مجموعه آموزشهای برنامهنویسی
- آموزش برنامه نویسی Swift (سوئیفت) برای برنامه نویسی iOS
- مجموعه آموزشهای دروس علوم و مهندسی کامپیوتر
- آموزش سوئیفت (Swift) — مجموعه مقالات مجله فرادرس
- ساخت اپلیکیشن کرنومتر با SwiftUI — از صفر تا صد
==