راستی آزمایی ایمیل (Email Confirmation) با React – راهنمای کاربردی
در این نوشته به بررسی روش تأیید ایمیل یا همان راستی آزمایی ایمیل در React میپردازیم.


روش تأیید ایمیل
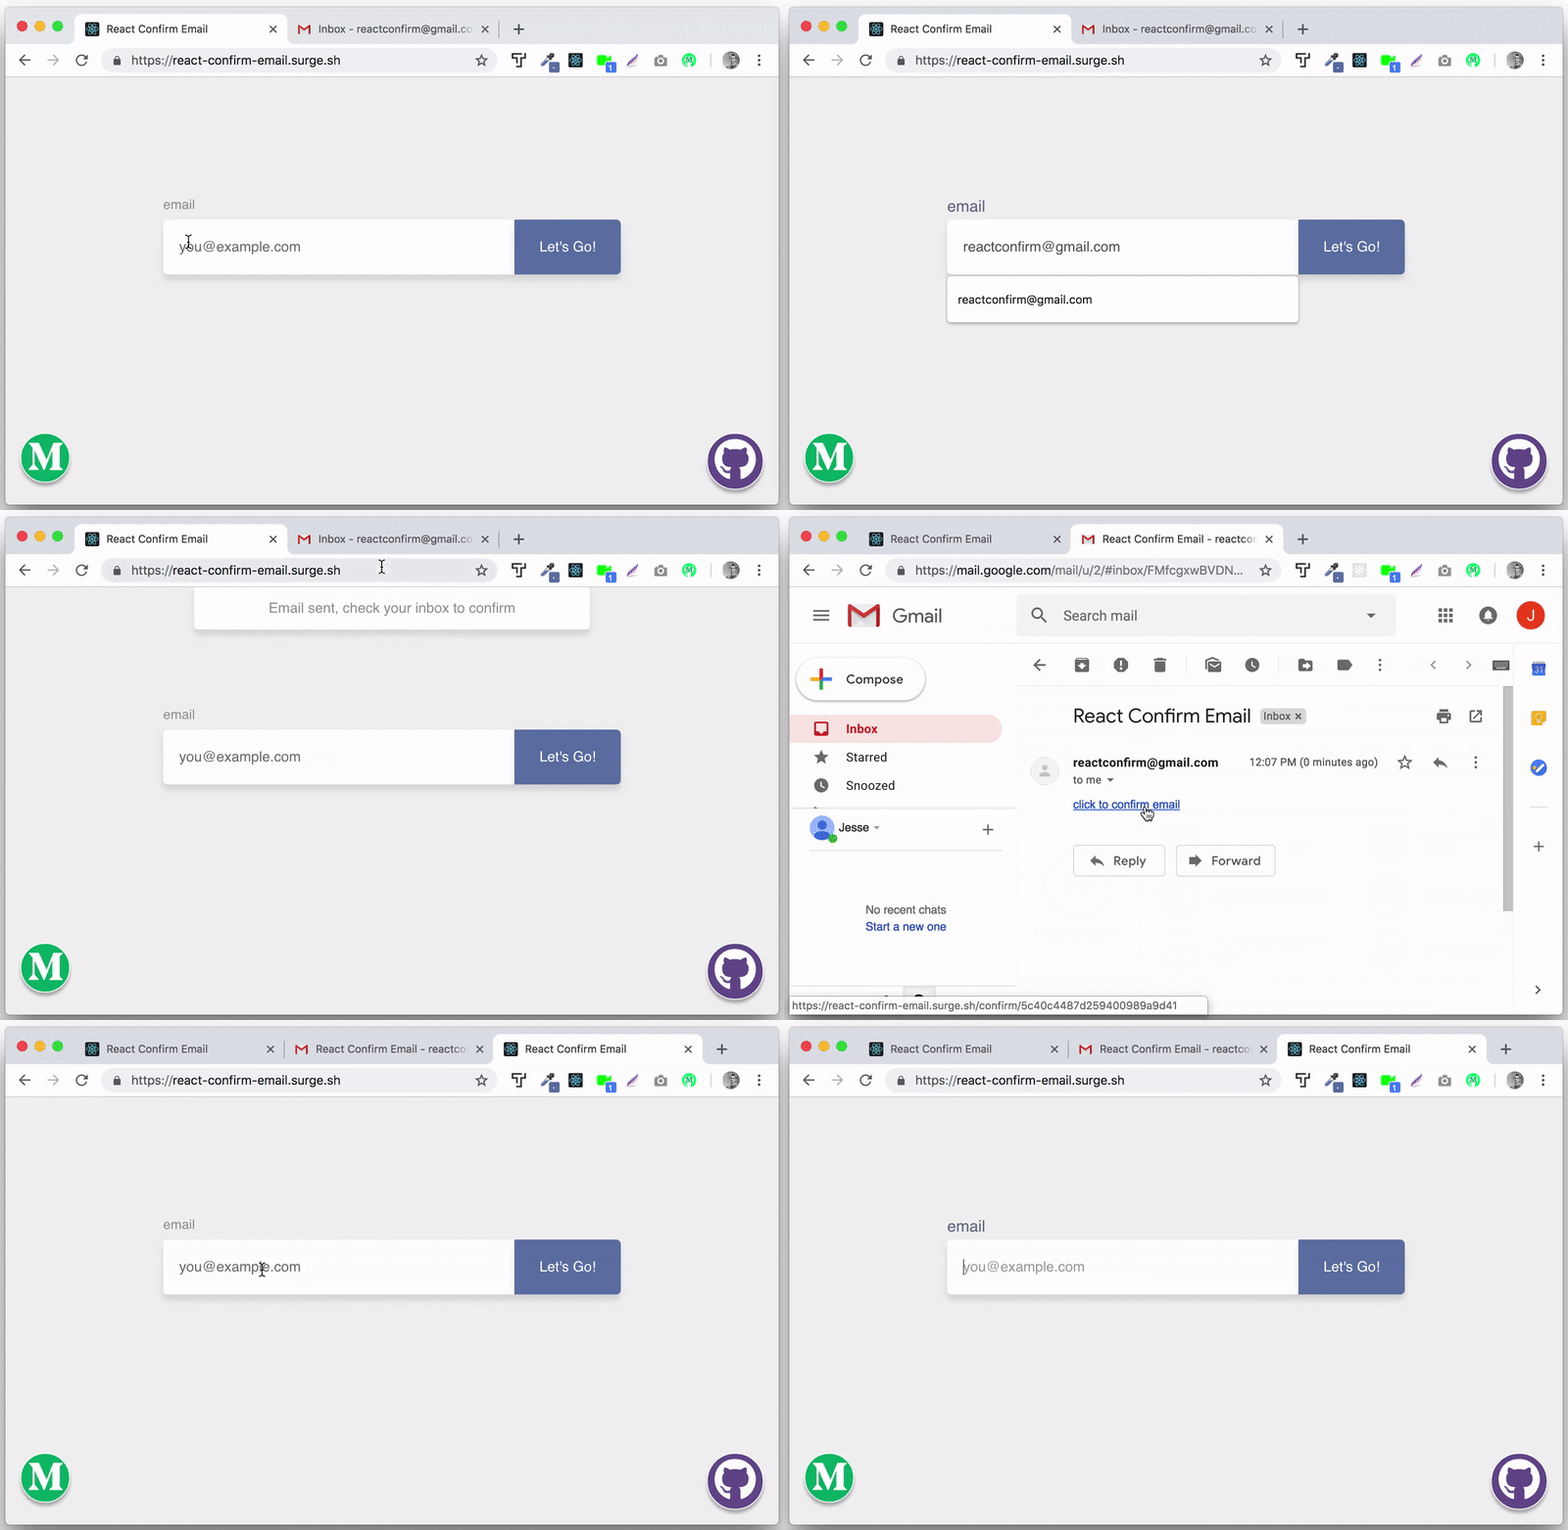
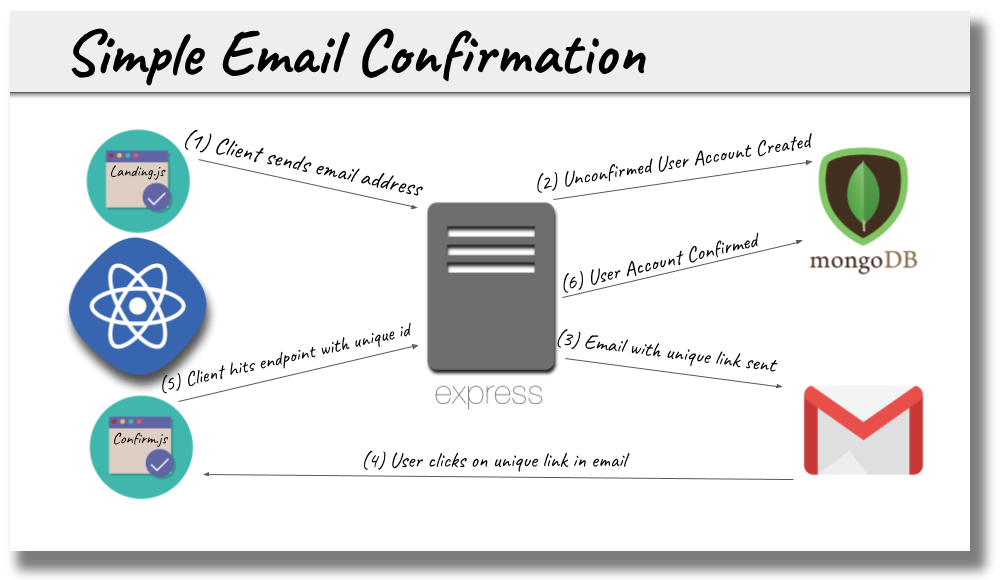
شاید تأیید ایمیل و راستی آزمایی آن موضوع سادهای به نظر برسد. تأیید ایمیل دستکم از زمانی که خود ایمیل متولد شده، وجود داشته است و ما گردش کاری آن را به خوبی میدانیم. یک ایمیل را برای تأیید از کاربر دریافت میکنیم و یک لینک به آن آدرس ارسال میکنیم. سپس پایگاه داده را بهروزرسانی میکنیم تا زمانی که کاربر روی لینک کلیک کرد، ایمیل وی را تأیید کند. همان طور که میبینید همه کار در سه گام ساده اجرا میشود. اما برای این که بتوان این کار را انجام داد به یک اپلیکیشن کامل نیاز داریم و از این رو فرصت مناسبی برای یادگیری طرز کار Mongo ،Express ،React و Node و همکاری آنها با هم به نظر میآید.

کلاینت React
کلاینت خود را به وسیله Create React App (+) بوتاسترپ میکنیم. ما فرض میکنیم که شما از قبل تجربیاتی در این زمینه دارید.
برای این که بتوانید مطالب مطرح شده در این راهنما را دنبال کنید تنها به سه چیز نیاز دارید:
- یک اپلیکیشن که پیش از آن که بتواند کاری انجام دهد در وضعیت قابل کارکرد باشد.
- بازخورد یعنی چیزی که وقتی اپلیکیشن کاری انجام میدهد اتفاق میافتد.
- تأییدیه که نشان میدهد اپلیکیشن کار خود را به پایان برده است.
کلاینت ما برای این اپلیکیشن تنها چند کامپوننت دارد و میتواند با کد و کامنت بسیار کمی که در ادامه نشان میدهیم نوشته شود. در این آموزش تلاش نکردهایم از حجم کد بکاهیم تا تجربه کاربری بهتری داشته باشیم.
نکته: شما میتوانید از Bit (+) برای مدیریت کامپوننتهای با قابلیت استفاده مجدد بهره بگیرید و در زمان خود صرفهجویی کنید. مجموعهای از کامپوننتهای مفید را نگهداری کنید و از آنها در پروژههای مختلف استفاده کرده و به سادگی تغییرات را همگامسازی کنید. Bit به ساخت سریعتر اپلیکیشنها کمک زیادی میکند.
فایل App.js
اینک نوبت به کدنویسی در زبان جاوا اسکریپت رسیده است. فایل App.js اپلیکیشن ما به صورت زیر خواهد بود:
فایل Landing.js
این فایل شامل کامپوننتی است که وقتی کاربر وارد اپلیکیشن میشود نمایش مییابد.
فایل Confirm.js
هنگامی که کاربر روی لینک یکتای موجود در ایمیلی که به آدرسش ارسال کردیم کلیک کند، این کامپوننت از سوی React Router (+) بارگذاری میشود.
فایل Spinner.js
اگر به کدهایی که در بخش قبلی مطرح کردیم، به قدر کافی دقت کرده باشید، متوجه شدهاید که ما در چهار موقعیت مختلف از کامپوننت < / Spinner> استفاده کردهایم. تنها چیزی که در این دفعات تغییر یافته است props است که به کامپوننت ارسال میشود.
Spinner.js بازخورد را در موقعیتهای زیر ارائه میکند:
- هنگامی که اپلیکیشن بارگذاری میشود.
- درون دکمه، هنگامی که فشرده میشود.
- هنگامی که لینک ایمیل کلیک میشود و سرور تأیید میکند.
- زمانی که دکمه ریاستارت کردن کل فرایند، فشرده میشود.
همه این موارد تنها در 8 خط از کد React نوشته شدهاند.
فایل Spinner.js انتهای کد کلاینت است. البته متوجه هستیم که این همه کد برای یک وظیفه ساده برای تأیید آدرس ایمیل زیاد به نظر میرسد. در واقع اگر بخش بازخورد و کامنت ها را حذف کنیم، تقریباً نیمی از حجم این کد کاسته میشود؛ اما در این حالت تجربه کاربری نیز دقیقاً نصف میشود!
نکته مهم این است که کاربر را در جریان کارهایی که در حال اجرا هستند قرار دهیم و به علاوه اپلیکیشنی داشته باشیم که پیش از آن که کاربر بخواهد کاری انجام دهد، کاملاً بارگذاری شده و آماده اجرا باشد.
گرچه ارائه بازخورد موجب میشود که حجم کد افزایش یابد، اما از سوی دیگر موجب افزایش کیفیت تجربه کاربری میشود. اینک باید کاری کنیم که کلاینت و سرور بتوانند با هم صحبت کنند.
نوشتن کد سرور
در این بخش کدهای مورد نیاز در سمت سرور را مینویسیم.
سرور
جهت راهاندازی و اجرا کردن سرور باید چندین مرحله از تنظیمات را طی کنیم:
- یک آدرس ایمیل ایجاد کند تا برای این اپلیکیشن مورد استفاده قرار دهید.
- Mongo را اجرا کنید تا مکانی برای ذخیره آدرسهای ایمیل داشته باشیم.
دریافت یک آدرس Gmail جدید
شما میتواند از این لینک (+) برای ثبت یک حساب کاربری جدید جیمیل اقدام کنید. دقت کنید که نباید از یک حساب جیمیل که برایتان مهم است استفاده کنید، چون اطلاعات رمز عبور آن در یک فایل env. روی نقاط مختلف سیستم ذخیره خواهد شد و علاوه بر آن چنان که در ادامه اشاره خواهیم کرد، امکان اجرای اپلیکیشنهای با امنیت کمتر (allow less secure apps) را در آن فعال خواهیم کرد. از این رو پیشگیری بهتر از درمان است و یک حساب کاربری جیمیل جدید میسازیم.
شما میتوانید این اپلیکیشن را با استفاده از آدرس ایمیلی از هر ارائه دهنده سرویس ایمیل مورد استفاده قرار دهید. برخی تنظیمات ممکن است در فایل sendEmail.js که در ادامه آمده است، اندکی متفاوت باشد و این تنظیمات به مشخصات ارائه دهنده ایمیل وابسته است. ما به منظور حفظ سادگی فرایند، در این راهنما از Gmail استفاده میکنیم.
پس از این که حساب جیمیل خود را ساختید، باید اطلاعات احراز هویت برای این حساب کاربری جدید را در یک فایل env. روی سرور قرار دهید. ما از فایل server/.env استفاده میکنیم و محتوای آن چنین خواهد بود:
MAIL_USER=your_new_email_address@gmail.com
MAIL_PASS=your_new_password
نکته مهم: برای این که حساب جیمیل جدیدی که ساختهاید بتواند به نیابت از شما ایمیلهایی ارسال کند و بدین ترتیب اپلیکیشن ما بتواند کار کند باید امکان «Less secure app access» را فعال کنیم. مراحل این کار در این صفحه پشتیبانی گوگل (+) توضیح داده شده است.
اجرا کردن Mongo
اگر از قبل Mongo را به صورت محلی نصب کرده باشید، اینک میدانید که باید از دستور زیر استفاده کنید:
$ mongod
فایل user.model.js
در مدل Mongoose ما تنها دو چیز را ردگیری میکنیم. یک آدرس ایمیل و این که آیا تأیید شده است یا نه.
فایل server.js
سعی میکنیم که این فایل را تا حد ممکن سبک نگه داریم و صرفاً به عنوان یک پوسته برای فایلهای دیگر کار کند. بنابراین تنها چند «میانافزار» (middleware) در آن قرار میدهیم و اتصالی به پایگاه داده ایجاد میکنیم.
فایل email.controller.js
در نهایت نوبت به مغز پردازشی عملیات میرسد. فایل email.controller.js اطلاعات مختلف مربوطه را از مسیرهای گوناگون گردآوری میکند، پایگاه داده را بر مبنای این اطلاعات بهروزرسانی کرده و بازخورد را به کلاینت بازمیگرداند، به طوری که کاربر متوجه میشود چه اتفاقی افتاده است.
نکته مهم که باید در مورد این فایل توجه داشته باشیم این است که دادههای ارائه شده یعنی محتواهایی که در ایمیل ارسال میشوند یا پیامهایی که در پاسخ دریافت میشوند هر کدام به فایلهای مربوطه خود میروند. بدین ترتیب کنترلر ما تمیز و سریع باقی میماند.
فایل email.msgs.js
لازم است که کدهای پوسته غیر کارکردی مانند این را در فایلهای خاص خود قرار دهیم. بدین ترتیب فایلهای دارای کارکردهای معین، منسجم میمانند و استدلال در مورد منطق اپلیکیشن آسانتر میشود.
فایل email.send.js
Nodemailer (+) یک ماژول npm است که ایمیل را ارسال میکند.
فایل email.templates.js
ما تنها یک نوع ایمیل در این اپلیکیشن ارسال میکنیم که ایمیل تأییدیه است. در نتیجه باید این قالب ایمیل را در فایلی مانند email.controller.js یا email.send.js قرار دهیم؛ اما این کار موجب میشود که بخشی از کارکرد اپلیکیشن در آن فایلها قرار گیرد و همان طور که قبلاً اشاره کردیم email.templates.js هیچ ارتباطی با منطق اپلیکیشن ندارد. در نتیجه باید یک فایل اختصاصی برای قالب ایمیل به نام email.templates.js بسازیم. بنابراین اگر در ادامه بخواهیم یک گردش کاری برای ایمیلهای «تأیید نشده»، «تبریک تولد» یا هر چیز دیگر بسازیم، این فایل به سادگی قابل بسط خواهد بود.
سخن پایانی
همان طور که در این راهنما دیدیم یک گردش کاری ساده مانند گردآوری آدرس ایمیل به یک اپلیکیشن کامل نیاز دارد. با جداسازی بخشهای کلاینت و سرور در بخشهای مجزا و قابل استفاده مجدد، این امکان را فراهم میکنیم که در صورتی که لازم باشد کارکردهای مختلفی در آینده به اپلیکیشن اضافه شوند، به راحتی آن را توسعه دهیم.
اگر این مطلب برای شما مفید بوده است، آموزشهای زیر نیز به شما پیشنهاد میشوند:
- مجموعه آموزش های برنامه نویسی
- آموزش مقدماتی فریمورک React Native برای طراحی نرم افزارهای اندروید و iOS با زبان جاوا اسکریپت
- مجموعه آموزش های طراحی و برنامه نویسی وب
- آموزش React.js در کمتر از ۵ دقیقه — از صفر تا صد
- راهنمای جامع React (بخش اول) — از صفر تا صد
- واکشی (Fetch) کردن داده ها در اپلیکیشن های React — به زبان ساده
==


سلام و وقت بخیر؛
برای بازیابی نشانی ایمیل، میبایست گزینه «فراموش کردن گذرواژه» یا عبارتهای مشابه را در پرووایدرهای مختلف کلیک کنید. به این ترتیب با استفاده از روشهای مختلفی که برای راستیآزمایی ادعای مالکیت شما روی نشانی مورد نظر وجود دارد، میتوانید نشانی ایمیل خود را بازیابی نمایید.
از توجه شما متشکرم.
سلام عرض خسته نباشید خدمت شما هز چی کوشیش می کنم ایمیل من باز نمیشه چند مرحله پیش میرم اما باز نمیشه چون قبلا به گوشی دگه من بوده که دگه قابل تعمیر نمیشه و ایمیل من باز نمیشه میشود یک کاری برای من بکنید