پاکسازی و بازسازی کدهای SwiftUI | به زبان ساده

در این مقاله با معرفی یک مثال به بررسی روش پاکسازی و بازسازی کدهای SwiftUI به صورت عملی میپردازیم. در این راهنما از نسخه بتای Xcode با SwiftUI 2.0 استفاده میکنیم. اگر شما نیز میخواهید مراحل این راهنما را به صورت عملی دنبال کنید باید مطمئن شوید که از همین نسخهها استفاده میکنید.
مقدمه
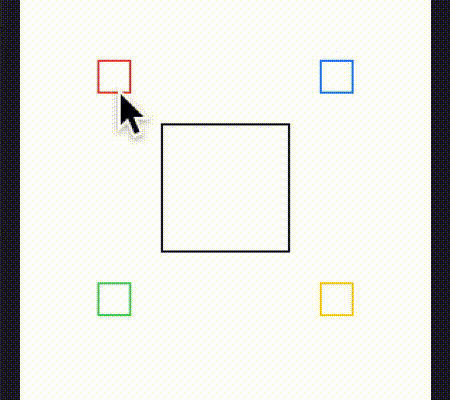
تلاش خواهیم کرد مثالی که در این راهنما بررسی میکنیم کاملاً ساده و سرراست باشد، چون در هر حال این یک راهنما است. در این مثال 5 باکس داریم که یک باکس بزرگ در مرکز و چهار باکس کوچکتر در چهار گوشه صفحه قرار دارند. زمانی که روی یکی از باکسهای کوچک کلیک کنیم، هر پنج باکس در آن جهت حرکت میکنند. برای درک بهتر به تصویر زیر توجه کنید:
راهحل
پیادهسازی این مثال ساده به نظر میرسد.

در ادامه پیشنویس اولیه کد برای انجام کارهای فوق را مشاهده میکنید. این یک پیادهسازی سریع و ساده برای اجرایی کردن ایده است. توجه کنید که بدنه حلقه اصلی شامل 45 خط کد است. در ادامه باید این بخش را «بازسازی» (refactor) کنیم:
1import SwiftUI
2
3struct SwiftUIViewG1: View {
4    @State var offSetX: CGFloat = 0
5    @State var offsetY: CGFloat = 0
6    var body: some View {
7      ZStack {
8        ZStack {
9          Rectangle()
10            .stroke(Color.black, lineWidth: 2)
11            .frame(width: 128, height: 128)
12        }
13        ZStack {
14          Rectangle()
15            .stroke(Color.red, lineWidth: 2)
16            .frame(width: 32, height: 32)
17            .onTapGesture {
18              offSetX -= 10; offsetY -= 10
19            }
20        }.frame(width: 256, height: 256, alignment: .topLeading)
21        ZStack {
22          Rectangle()
23            .stroke(Color.blue, lineWidth: 2)
24            .frame(width: 32, height: 32)
25            .onTapGesture {
26              offSetX += 10; offsetY -= 10
27            }
28        }.frame(width: 256, height: 256, alignment: .topTrailing)
29        ZStack {
30          Rectangle()
31            .stroke(Color.green, lineWidth: 2)
32            .frame(width: 32, height: 32)
33            .onTapGesture {
34              offSetX -= 10; offsetY += 10
35
36            }
37        }.frame(width: 256, height: 256, alignment: .bottomLeading)
38        ZStack {
39          Rectangle()
40            .stroke(Color.yellow, lineWidth: 2)
41            .frame(width: 32, height: 32)
42            .onTapGesture {
43              offSetX += 10; offsetY += 10
44
45            }
46        }.frame(width: 256, height: 256, alignment: .bottomTrailing)
47      }.offset(x:offSetX, y:offsetY)
48    }
49}
50
51struct SwiftUIViewG1_Previews: PreviewProvider {
52    static var previews: some View {
53        SwiftUIViewG1()
54    }
55}
در کد فوق میبینیم که پنج مستطیل درون تعدادی ZStacks ایجاد شده و به تعدادی ZStacks اضافه شدهاند تا باکسها بتوانند در زمان تپ شدن، جابجا شوند. اکنون تلاش میکنیم تا این کد را بهبود ببخشیم.
یکی از نخستین کارهایی که باید انجام دهیم، این است که مطمئن شویم از اعداد جادویی یعنی «ارقام لفظی» (literal figures) استفاده نمیکنیم. این موارد را در کد با ثوابت تعویض میکنیم:
1import SwiftUI
2
3struct SwiftUIViewG2: View {
4    let bigBox:CGFloat = 256
5    let mediumBox:CGFloat = 128
6    let smallBox:CGFloat = 32
7    let lineWidth:CGFloat = 2
8    let xOffsetToBigBox:CGFloat = 10
9    let yOffsetToBigBox:CGFloat = 10
10
11    @State var bigBoxOffset = CGSize(width: 0, height: 0)
12    @State var offSetX: CGFloat = 0
13    @State var offsetY: CGFloat = 0
14
15    var body: some View {
16      ZStack {
17        ZStack {
18          Rectangle()
19            .stroke(Color.black, lineWidth: lineWidth)
20            .frame(width: mediumBox, height: mediumBox)
21        }
22
23        ZStack {
24          Rectangle()
25            .stroke(Color.red, lineWidth: lineWidth)
26            .frame(width: smallBox, height: smallBox)
27            .onTapGesture {
28              offSetX -= xOffsetToBigBox
29              offsetY -= yOffsetToBigBox
30            }
31        }.frame(width: bigBox, height: bigBox, alignment: .topLeading)
32
33        ZStack {
34          Rectangle()
35            .stroke(Color.blue, lineWidth: lineWidth)
36            .frame(width: smallBox, height: smallBox)
37            .onTapGesture {
38              offSetX += xOffsetToBigBox
39              offsetY -= yOffsetToBigBox
40            }
41        }.frame(width: bigBox, height: bigBox, alignment: .topTrailing)
42
43        ZStack {
44          Rectangle()
45            .stroke(Color.green, lineWidth: lineWidth)
46            .frame(width: smallBox, height: smallBox)
47            .onTapGesture {
48              offSetX -= xOffsetToBigBox
49              offsetY += yOffsetToBigBox
50            }
51        }.frame(width: bigBox, height: bigBox, alignment: .bottomLeading)
52
53        ZStack {
54          Rectangle()
55            .stroke(Color.yellow, lineWidth: lineWidth)
56            .frame(width: smallBox, height: smallBox)
57            .onTapGesture {
58              offSetX += xOffsetToBigBox
59              offsetY += yOffsetToBigBox
60            }
61        }.frame(width: bigBox, height: bigBox, alignment: .bottomTrailing)
62      }.offset(x:offSetX, y:offsetY)
63    }
64}
65
66struct SwiftUIViewG2_Previews: PreviewProvider {
67    static var previews: some View {
68        SwiftUIViewG2()
69    }
70}
این کد ظاهر بسیار بهتری دارد. کد فوق با حذف همه اعدادی که در سراسر کد پخش شده بودند، خوانایی بهتری یافته است. به علاوه اکنون میتوانیم معنی اعداد را بهتر درک کنیم. در ادامه با بررسی کد میبینیم که بخش زیادی از کد تکراری است. ما میتوانیم بخش رسم مجدد باکسها را فاکتور بگیریم و یک ساختار برای فعالسازی جستچرها معرفی کنیم:
1import SwiftUI
2
3struct SwiftUIViewG3: View {
4    let bigBox:CGFloat = 256
5
6    let smallBox:CGFloat = 32
7    let xOffsetToBigBox:CGFloat = 10
8    let yOffsetToBigBox:CGFloat = 10
9
10    @State var offsetsToBigBox = CGSize(width: 10, height: 10)
11
12    @State var redOffset = CGSize(width: -10, height: -10)
13    @State var blueOffset = CGSize(width: +10, height: -10)
14    @State var greenOffset = CGSize(width: -10, height: +10)
15    @State var yellowOffset = CGSize(width: +10, height: +10)
16
17    @State var bigBoxOffset = CGSize(width: 0, height: 0)
18    @State var lineWidth:CGFloat = 2
19
20    var body: some View {
21      ZStack {
22        ZStack {
23          drawMBoxRectangleG3(lineColor: Color.black, lineWidth: $lineWidth)
24        }
25
26        ZStack {
27          drawSBoxRectangleG3(lineColor: Color.red, lineWidth: $lineWidth, bigBoxOffset: $bigBoxOffset, offsetsToBigBox: $redOffset)
28        }.frame(width: bigBox, height: bigBox, alignment: .topLeading)
29
30        ZStack {
31          drawSBoxRectangleG3(lineColor: Color.blue, lineWidth: $lineWidth, bigBoxOffset: $bigBoxOffset, offsetsToBigBox: $blueOffset)
32        }.frame(width: bigBox, height: bigBox, alignment: .topTrailing)
33
34        ZStack {
35          drawSBoxRectangleG3(lineColor: Color.green, lineWidth: $lineWidth, bigBoxOffset: $bigBoxOffset, offsetsToBigBox: $greenOffset)
36        }.frame(width: bigBox, height: bigBox, alignment: .bottomLeading)
37
38        ZStack {
39          drawSBoxRectangleG3(lineColor: Color.yellow, lineWidth: $lineWidth, bigBoxOffset: $bigBoxOffset, offsetsToBigBox: $yellowOffset)
40        }.frame(width: bigBox, height: bigBox, alignment: .bottomTrailing)
41      }
42       .offset(bigBoxOffset)
43    }
44}
45
46struct drawSBoxRectangleG3: View {
47  let smallBox:CGFloat = 32
48
49  @State var lineColor: Color
50  @Binding var lineWidth: CGFloat
51  @Binding var bigBoxOffset: CGSize
52  @Binding var offsetsToBigBox:CGSize
53
54  var body: some View {
55    Rectangle()
56      .stroke(lineColor, lineWidth: lineWidth)
57      .frame(width: smallBox, height: smallBox)
58      .onTapGesture {
59          bigBoxOffset.width += offsetsToBigBox.width
60          bigBoxOffset.height += offsetsToBigBox.height
61      }
62  }
63}
64
65struct drawMBoxRectangleG3: View {
66  let mediumBox:CGFloat = 128
67
68  @State var lineColor: Color
69  @Binding var lineWidth: CGFloat
70
71  var body: some View {
72    Rectangle()
73      .stroke(lineColor, lineWidth: lineWidth)
74      .frame(width: mediumBox, height: mediumBox)
75  }
76}
77
78
79struct SwiftUIViewG3_Previews: PreviewProvider {
80    static var previews: some View {
81        SwiftUIViewG3()
82    }
83}
اینک کد ظاهر بسیار بهتری یافته است. بدنه کد اکنون به 25 خط کاهش یافته است. آیا بهبود دیگری وجود دارد که بتوان اجرا کرد؟ واقعیت این است که فرمولهای ریاضی زیادی برای جابجا کردن باکسها به همراه متغیرهای @State استفاده شده است. باید کاری کنیم که این بخش کمی سرراستتر شود، بنابراین یک enum اضافه کرده و کد را درون خود متد قرار میدهیم. با استفاده از یک enum میتوانیم اتفاقاتی که میافتد را به صورت روشنتری به نمایش بگذاریم.
همچنین متدهایی که به رسم باکسها درون دامنه struct اصلی مربوط میشوند را جابجا کردهایم و در آغاز کار سطح بالاتری اعلان نمودهایم:
1import SwiftUI
2
3struct SwiftUIViewG4: View {
4
5    enum boxMove {
6      case topLeft
7      case topRight
8      case bottomLeft
9      case bottomRight
10    }
11
12    let shiftBox: boxMove
13    let bigBox:CGFloat = 256
14
15    @State var bigBoxOffset = CGSize(width: 0, height: 0)
16    @State var lineWidth:CGFloat = 2
17
18    struct drawSBoxRectangleG4: View {
19      let smallBox:CGFloat = 32
20      let xOffsetToBigBox:CGFloat = 10
21      let yOffsetToBigBox:CGFloat = 10
22      let lineWidth:CGFloat = 2
23
24      @State var lineColor: Color
25      @State var boxDirection: boxMove
26      @Binding var bigBoxOffset: CGSize
27
28      var body: some View {
29        Rectangle()
30          .stroke(lineColor, lineWidth: lineWidth)
31          .frame(width: smallBox, height: smallBox)
32          .onTapGesture {
33            switch boxDirection {
34              case .topLeft:
35                bigBoxOffset.width -= xOffsetToBigBox
36                bigBoxOffset.height -= yOffsetToBigBox
37              case .topRight:
38                bigBoxOffset.width += xOffsetToBigBox
39                bigBoxOffset.height -= yOffsetToBigBox
40              case .bottomLeft:
41                bigBoxOffset.width -= xOffsetToBigBox
42                bigBoxOffset.height += yOffsetToBigBox
43              case .bottomRight:
44                bigBoxOffset.width += xOffsetToBigBox
45                bigBoxOffset.height += yOffsetToBigBox
46            }
47          }
48        }
49      }
50
51      struct drawMBoxRectangleG4: View {
52        let mediumBox:CGFloat = 128
53        let lineWidth:CGFloat = 2
54
55        @State var lineColor: Color
56
57        var body: some View {
58          Rectangle()
59            .stroke(lineColor, lineWidth: lineWidth)
60            .frame(width: mediumBox, height: mediumBox)
61        }
62      }
63
64    var body: some View {
65      ZStack {
66        ZStack {
67          drawMBoxRectangleG4(lineColor: Color.black)
68        }
69
70        ZStack {
71          drawSBoxRectangleG4(lineColor: Color.red, boxDirection: .topLeft, bigBoxOffset: $bigBoxOffset)
72        }.frame(width: bigBox, height: bigBox, alignment: .topLeading)
73
74        ZStack {
75          drawSBoxRectangleG4(lineColor: Color.blue, boxDirection: .topRight, bigBoxOffset: $bigBoxOffset)
76        }.frame(width: bigBox, height: bigBox, alignment: .topTrailing)
77
78        ZStack {
79          drawSBoxRectangleG4(lineColor: Color.green, boxDirection: .bottomLeft, bigBoxOffset: $bigBoxOffset)
80        }.frame(width: bigBox, height: bigBox, alignment: .bottomLeading)
81
82        ZStack {
83          drawSBoxRectangleG4(lineColor: Color.yellow, boxDirection: .bottomRight,  bigBoxOffset: $bigBoxOffset)
84        }.frame(width: bigBox, height: bigBox, alignment: .bottomTrailing)
85      }.offset(bigBoxOffset)
86  }
87}
88
89struct SwiftUIViewG4_Previews: PreviewProvider {
90    static var previews: some View {
91      SwiftUIViewG4(shiftBox: .topLeft)
92    }
93}
این کد کمی بهتر شد، اما حجم حلقه اصلی را چندان کاهش نداد. در گام بعدی باید کپسولهسازی را به دقت تنظیم کنیم. به این منظور public و همچنین private را اضافه میکنیم تا کدها کاملاً روشن شوند.
همچنین «جهتگیری» (alignment) که سمت حرکت را مشخص میکرد را نیز حذف کردیم، زیرا میخواهیم یک حلقه در این فرایند تعریف کنیم و تعداد پارامترهایی که باید ارسال شوند را کاهش دهیم. این alignment را میتوان به صورت مستقیم روی direction نگاشت کرد و این دقیقاً همان کاری است که در کد زیر انجام دادهایم:
1import SwiftUI
2
3struct SwiftUIViewG5: View {
4
5  public enum boxMove {
6    case topLeft
7    case topRight
8    case bottomLeft
9    case bottomRight
10  }
11
12  public let shiftBox: boxMove
13  private let bigBox:CGFloat = 256
14
15  @State private var bigBoxOffset = CGSize(width: 0, height: 0)
16  @State private var lineWidth:CGFloat = 2
17
18  private struct drawSBoxRectangleG5: View {
19
20    private let bigBox:CGFloat = 256
21    private let smallBox:CGFloat = 32
22    private let xOffsetToBigBox:CGFloat = 10
23    private let yOffsetToBigBox:CGFloat = 10
24    private let lineWidth:CGFloat = 2
25
26
27    @State public var lineColor: Color
28    @State public var boxDirection: boxMove
29    @State private var alignToCorner: Alignment = .center
30
31    @Binding public var bigBoxOffset: CGSize
32
33    var body: some View {
34      ZStack {
35        Rectangle()
36          .stroke(lineColor, lineWidth: lineWidth)
37          .frame(width: smallBox, height: smallBox)
38          .onTapGesture {
39            switch boxDirection {
40            case .topLeft:
41              bigBoxOffset.width -= xOffsetToBigBox
42              bigBoxOffset.height -= yOffsetToBigBox
43            case .topRight:
44              bigBoxOffset.width += xOffsetToBigBox
45              bigBoxOffset.height -= yOffsetToBigBox
46            case .bottomLeft:
47              bigBoxOffset.width -= xOffsetToBigBox
48              bigBoxOffset.height += yOffsetToBigBox
49            case .bottomRight:
50              bigBoxOffset.width += xOffsetToBigBox
51              bigBoxOffset.height += yOffsetToBigBox
52            }
53          }.onAppear( perform: {
54            switch boxDirection {
55            case .topLeft:
56              alignToCorner = .topLeading
57            case .topRight:
58              alignToCorner = .topTrailing
59            case .bottomLeft:
60              alignToCorner = .bottomLeading
61            case .bottomRight:
62              alignToCorner = .bottomTrailing
63            }
64          })
65      }.frame(width: bigBox, height: bigBox, alignment: alignToCorner)
66    }
67  }
68
69  private struct drawMBoxRectangleG5: View {
70
71    private let mediumBox:CGFloat = 128
72    private let lineWidth:CGFloat = 2
73
74    @State public var lineColor: Color
75
76    var body: some View {
77      Rectangle()
78        .stroke(lineColor, lineWidth: lineWidth)
79        .frame(width: mediumBox, height: mediumBox)
80    }
81  }
82
83  struct align: Hashable {
84    var id = UUID()
85    var directionToHead: boxMove
86  }
87
88  var corners:[align] = [align(directionToHead: .topLeft),
89                         align(directionToHead: .topRight),
90                         align(directionToHead: .bottomLeft),
91                         align(directionToHead: .bottomRight)]
92
93  var body: some View {
94    ZStack {
95      ZStack {
96        drawMBoxRectangleG5(lineColor: Color.black)
97      }
98
99      ForEach(corners, id: \.self) { corner in
100        drawSBoxRectangleG5(lineColor: Color.red, boxDirection: corner.directionToHead, bigBoxOffset: $bigBoxOffset)
101      }
102
103    }.offset(bigBoxOffset)
104  }
105}
106
107struct SwiftUIViewG5_Previews: PreviewProvider {
108  static var previews: some View {
109    SwiftUIViewG5(shiftBox: .topLeft)
110  }
111}
سخن پایانی
به این ترتیب به انتهای این راهنما میرسیم. با این که ما کد را با 55 خط آغاز کرده و به در نهایت به کدی با 110 خط رسیدیم، اما تقریباً همه خطوط کد اولیه در حلقه اصلی قرار داشتند. این حلقه اصلی بیش از یک صفحه منفرد نمایشگر را اشغال میکند. به طور عکس حلقه اصلی اینک شامل صرفاً 11 خط کد است و منطق آن بسیار سادهتر شده و درک آن نیز به آسانتر صورت میگیرد.
نکته آخری که باید مورد اشاره قرا دهیم، این است که ما تلاش کردیم var و align را به صورت struct خصوصی درآوریم. اما در این حالت امکان کامپایل وجود نداشت، زیرا بخش پیشنمایش در مورد سطح حفاظت خطا میداد. بنابراین preview را کامنت کردیم تا بتوانیم این گام آخر را اجرا کنیم. متأسفانه این مشکل نشان میدهد که بخش preview مشکلاتی دارد.