یادگیری ماشین در جاوا اسکریپت — به زبان ساده
در جریان گردهمایی TensorFlow Developer Summit در سال 2018، تیم توسعه کتابخانه TensorFlow، از نسخه جدیدی از کتابخانه TensorFlow برای «زبان برنامهنویسی جاوا اسکریپت» (JavaScript Programming Language) پرده برداشتند؛ کتابخانه TensorFlow.js. این کتابخانه، ابزاری «منبع باز» (Open Source) برای تعریف، «آموزش» (Train) و اجرای مدلهای یادگیری ماشین در جاوا اسکریپت محسوب میشود.
به عبارت دیگر، این کتابخانه به کاربران، برنامهنویسان و توسعهدهندگان اجازه میدهد تا با استفاده از زبان جاوا اسکریپت و یک «واسط برنامهنویسی کاربردی» (Application Programming Interfaces | API) سطح بالا برای لایههای برنامهنویسی، مدلهای «یادگیری ماشین» (Machine Learning) را به طور کامل در مرورگرهای صفحات وب اجرا کنند.
در این مطلب، بررسی اجمالی از کتابخانه یادگیری ماشین در جاوا اسکریپت یا TensorFlow.js ارائه خواهد شد.

کتابخانه یادگیری ماشین در جاوا اسکریپت (TensorFlow.js)
کتابخانه یادگیری ماشین در جاوا اسکریپت (TensorFlow.js)، به برنامهنویسان جاوا اسکریپت و تازه وارد به حوزه یادگیری ماشین اجازه میدهد تا به بهترین شکل ممکن با توسعه نرمافزارهای تحت وب هوشمند، توسط زبان جاوا اسکریپت و کتابخانه TensorFlow.js آشنا شوند. همچنین، کتابخانه یادگیری ماشین در جاوا اسکریپت، نقطه شروع مناسبی جهت یادگیری مباحث مرتبط با «یادگیری عمیق» (Deep Learning) و «بینایی کامپیوتر» (Computer Vision) برای برنامهنویسان مبتدی و علاقهمندان به زبان جاوا اسکریپت محسوب میشود.
از سوی دیگر، کتابخانه یادگیری ماشین در جاوا اسکریپت (TensorFlow.js)، دستهای از برنامهنویسان و توسعهدهندگان یادگیری ماشین را هدف قرار میدهد که به تازگی از دیگر زبانهای برنامهنویسی به زبان جاوا اسکریپت مهاجرت کردهاند. کتابخانه TensorFlow.js به چنین برنامهنویسانی اجازه میدهد که مدلهای یادگیری ماشین را توسط زبان جاوا اسکریپت طراحی و در مرورگرهای صفحات وب اجرا کنند.

کتابخانه TensorFlow.js: یادگیری ماشین در مرورگر
اجرای مدلها و برنامههای یادگیری ماشین، به صورت سرویسهای «سمت کاربر» (Client-Side) در مرورگرها، فرصتهای جدیدی برای محققان پدید میآورد و پلتفرم توسعه نرمافزار جدیدی برای توسعه دهندگان یادگیری ماشین ایجاد میکند؛ با به وجود آمدن قابلیت اجرای مدلهای یادگیری ماشین در مرورگرها، حوزه تحقیقاتی و برنامهنویسی جدیدی به نام سیستمهای «یادگیری ماشین تعاملی» (Interactive Machine Learning) پدید میآید.
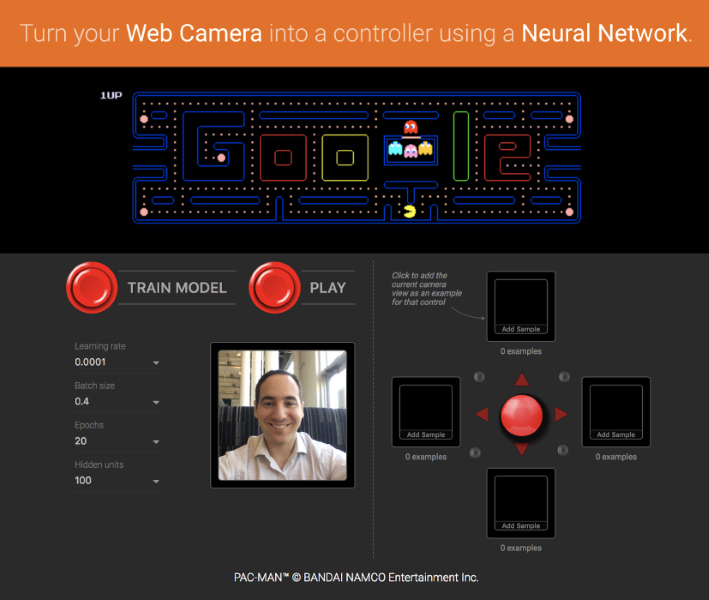
در جریان گردهمایی TensorFlow Developer Summit در سال 2018، دو نفر از افراد شاغل در تیم توسعه کتابخانه TensorFlow، «آموزش» (Train) یک مدل یادگیری ماشین را برای کنترل بازی PAC-MAN با استفاده از بینایی کامپیوتر و «وبکم» (WebCam) به نمایش گذاشتند.
ویژگی مهم نمایش ارائه شده از نحوه عملکرد کتابخانه یادگیری ماشین در جاوا اسکریپت (TensorFlow.js) این بود که تمامی مراحل اجرای برنامه (آموزش مدل و کنترل بازی PAC-MAN با استفاده از تکنیکهای بینایی کامپیوتر و وبکم)، به طور کامل، در مرورگر صفحات وب انجام شده بود.
تیم توسعه کتابخانه TensorFlow.js این امکان را برای کاربران و توسعهدهندگان مختلف فراهم آوردهاند تا قابلیتهای کتابخانه یادگیری ماشین در جاوا اسکریپت و نحوه عملکرد آن در کنترل بازی PAC-MAN را از طریق لینک [+] مشاهده کنند.
آموزش مدل با استفاده از کتابخانه یادگیری ماشین در جاوا اسکریپت
از دیدگاه کاربر عادی، اجرای مدلهای یادگیری ماشین در مرورگر وب بدین معنی است که دیگر نیازی به نصب کتابخانههای برنامهنویسی و برنامههای راهاندازی دستگاه (Drivers) روی سیستم وجود ندارد. تنها کاری که کاربر باید انجام دهد این است که مرورگر سیستم خود را باز، صفحه وب مرتبط با برنامهکاربردی تحت وب (برنامهای که مدل یادگیری ماشین در جاوا اسکریپت را اجرا میکند) را بارگذاری و برنامه کاربردی پیادهسازی شده را اجرا کند.
یکی از ویژگیهای مهم کتابخانه یادگیری ماشین در جاوا اسکریپت (TensorFlow.js)، امکان استفاده از شتاب پردازشی «واحدهای پردازش گرافیکی» (Graphical Processing Units | GPUs) برای آموزش و اجرای مدلهای یادگیری ماشین است. کتابخانه یادگیری ماشین در جاوا اسکریپت (TensorFlow.js)، به طور خودکار از قابلیتهای WebGL پشتیبانی میکند؛ به عبارت دیگر، زمانی که سیستم، وجود یک واحد پردازش گرافیکی را تشخیص دهد، اجرای کدهای نوشته شده، به صورت خودکار و بدون درگیر کردن کاربر با جزئیات، توسط واحد پردازش گرافیکی شتاب پیدا میکند.
یکی از قابلیتهای مهم هنگام استفاده از کتابخانه TensorFlow.js در پلتفرمهای همراه، امکان استفاده از اطلاعات و «دادههای حسگرها» (Sensor Data) برای مدلسازی روشهای یادگیری ماشین است. به بیان سادهتر، زمانی که کاربران یک صفحه وبِ اجرا کننده مدل یادگیری ماشین در جاوا اسکریپت را باز میکنند، مدل یادگیری ماشین (آموزش داده شده و یا در حال آموزش) قادر خواهد بود تا از دادههای حس شده توسط حسگرهایی نظیر «ژیروسکوپ» (Gyroscope) و «شتابسنج» (Accelerometer) بهره ببرد.
همچنین، تمامی دادههای واکشی یا حس شده (توسط سنسورها)، به صورت «سمت کاربر» (Client-Side) ذخیرهسازی و نگهداری میشوند. چنین قابلیت مهمی در کتابخانه یادگیری ماشین در جاوا اسکریپت، دو ویژگی بسیار مفید را برای TensorFlow.js و مدلهای یادگیری ماشین توسعه داده توسط این کتابخانه فراهم میآورد:
- کتابخانه TensorFlow.js را به یکی از مهمترین ابزارهای زبان جاوا اسکریپت جهت انجام عملیات «استنتاج کمتأخیر» (Low-Latency Inference) در پلتفرمهای همراه تبدیل میکند.
- امنیت کاربران را تأمین و از حریم خصوصی آنها محافظت میکند.
کاربردهای کتابخانه یادگیری ماشین در جاوا اسکریپت (TensorFlow.js)
در صورتی که برنامهنویسان و توسعهدهنگان، به توسعه مدلهای یادگیری ماشین در جاوا اسکریپت علاقهمند باشند، سه «جریان کاری» (Workflow) زیر را میتوانند برای توسعه برنامههای کاربردی هوشمند در نظر بگیرند:
- برنامهنویسان و توسعهدهندگان یادگیری ماشین میتوانند مدلهای موجود و «از پیش آموزش داده شده» (Pre-Trained Models) را برای انجام استنتاج، در برنامههای جاوا اسکریپت نوشته شده توسط TensorFlow.js وارد (import) کنند. به عبارت دیگر، در صورتی که یک مدل TensorFlow یا Keras از پیش آموزش داده شده موجود باشد، این امکان برای برنامهنویسان و توسعهدهندگان جاوا اسکریپت فراهم شده است تا این مدلها را به قالب پشتیبانی شده توسط جاوا اسکریپت تبدیل و برای انجام استنتاج، در مرورگر خود بارگیری (Load) کنند.
- این امکان برای برنامهنویسان و توسعهدهندگان زبان جاوا اسکریپت فراهم شده است تا یک مدل یادگیری ماشین وارد شده به سیستم را دوباره آموزش دهند (Re-Train). مانند نمایش ارائه شده از آموزش مدل یادگیری ماشین و کنترل بازی PAC-MAN با استفاده از بینایی کامپیوتر و وبکم، برنامهنویسان و توسعهدهندگان میتوانند با استفاده از تکنیکهای «یادگیری انتقال» (Transfer Learning)، یک مدل از پیش آموزش داده شده را دادههای اندکی آموزش دوباره دهند و آن را برای استنتاج در دامنه جدید آماده کنند.
- برای چنین کاری، از تکنیکی به نام «آموزش دوباره دستهبندهای تصویر» (Re-training Image Classifiers) استفاده میشود. در این تکنیک، از حجم کمی از دادههای جمعآوری شده در مرورگر، برای آموزش دوباره مدل از پیش آموزش داده شده، در دامنه کاربردی جدید استفاده میشود.
- ویژگی مهم چنین تکنیکهایی، صرفهجویی در زمان (لازم برای آموزش دوباره مدل با حجم عظیمی از دادهها) است. به عبارت دیگر، با استفاده از حجم بسیار کمی از دادههای آموزشی جدید، میتوان مدل از پیش آموزش داده شده را دوباره آموزش داد تا یک مدل دقیق یادگیری ماشین برای استنتاج در دامنههای کاربری جدید تولید شود.
- میتوان مدل یادگیری ماشین را به طور مستقیم در مرورگرها اجرا کرد. این امکان برای توسعهدهنگان و برنامهنویسان جاوا اسکریپت فراهم شده است تا عملیات طراحی، آموزش و اجرای مدلهای یادگیری ماشین را با استفاده از زبان جاوا اسکریپت و APIهای (واسطهای برنامهنویسی کاربردی) سطح بالا برای لایههای برنامهنویسی، به طور کامل در مرورگر انجام دهند.
- در صورتی که برنامهنویس با کتابخانه Keras آشنایی داشته باشد، بدون شک، با مبحث APIهای سطح بالا برای لایههای برنامهنویسی نیز آشنایی خواهد داشت.
مؤلفههای کد نویسی مدلهای یادگیری ماشین با کتابخانه TensorFlow.js
همانطور که پیش از این نیز اشاره شد، برنامهنویسان و توسعهدهندگان یادگیری ماشین میتوانند مدلهایTensorFlow یا Keras از پیش آموزش داده شده را برای انجام استنتاج، در برنامههای جاوا اسکریپت نوشته شده توسط TensorFlow.js مورد استفاده قرار دهند. همچنین، این مکان وجود دارد که فرایند طراحی و آموزش مدلهای یادگیری ماشین، به طور کامل، توسط زبان جاوا اسکریپت انجام شود.
در ادامه، بخشی از کدهای لازم برای آموزش مدل یادگیری ماشین و کنترل بازی PAC-MAN با استفاده از تکنیکهای بینایی کامپیوتر و وبکم نمایش داده میشود.
در این قسمت، ابتدا قطعه کد ControllerDataset نمایش داده میشود. در مثال بازی PAC-MAN، از یک «مجموعه داده» (Dataset) برای کنترلهای مبتنی بر وبکم استفاده شده است. این امکان برای کاربران فراهم شده است تا نمایش «تانسوری» (Tensor) از نمونههای مشابه با دادههای دیتاست را توسط قطعه کد زیر به مجموعه داده اضافه کنند.
1/**
2 * @license
3 * Copyright 2018 Google LLC. All Rights Reserved.
4 * Licensed under the Apache License, Version 2.0 (the "License");
5 * you may not use this file except in compliance with the License.
6 * You may obtain a copy of the License at
7 *
8 * http://www.apache.org/licenses/LICENSE-2.0
9 *
10 * Unless required by applicable law or agreed to in writing, software
11 * distributed under the License is distributed on an "AS IS" BASIS,
12 * WITHOUT WARRANTIES OR CONDITIONS OF ANY KIND, either express or implied.
13 * See the License for the specific language governing permissions and
14 * limitations under the License.
15 * =============================================================================
16 */
17import * as tf from '@tensorflow/tfjs';
18
19/**
20 * A dataset for webcam controls which allows the user to add example Tensors
21 * for particular labels. This object will concat them into two large xs and ys.
22 */
23export class ControllerDataset {
24  constructor(numClasses) {
25    this.numClasses = numClasses;
26  }
27
28  /**
29   * Adds an example to the controller dataset.
30   * @param {Tensor} example A tensor representing the example. It can be an image,
31   *     an activation, or any other type of Tensor.
32   * @param {number} label The label of the example. Should be a number.
33   */
34  addExample(example, label) {
35    // One-hot encode the label.
36    const y = tf.tidy(
37        () => tf.oneHot(tf.tensor1d([label]).toInt(), this.numClasses));
38
39    if (this.xs == null) {
40      // For the first example that gets added, keep example and y so that the
41      // ControllerDataset owns the memory of the inputs. This makes sure that
42      // if addExample() is called in a tf.tidy(), these Tensors will not get
43      // disposed.
44      this.xs = tf.keep(example);
45      this.ys = tf.keep(y);
46    } else {
47      const oldX = this.xs;
48      this.xs = tf.keep(oldX.concat(example, 0));
49
50      const oldY = this.ys;
51      this.ys = tf.keep(oldY.concat(y, 0));
52
53      oldX.dispose();
54      oldY.dispose();
55      y.dispose();
56    }
57  }
58}
در ادامه، قطعه کد اصلی برای آموزش مدل یادگیری ماشین و کنترل بازی PAC-MAN توسط وبکم و تکنیکهای بینایی کامپیوتر نمایش داده میشود:
1/**
2 * @license
3 * Copyright 2018 Google LLC. All Rights Reserved.
4 * Licensed under the Apache License, Version 2.0 (the "License");
5 * you may not use this file except in compliance with the License.
6 * You may obtain a copy of the License at
7 *
8 * http://www.apache.org/licenses/LICENSE-2.0
9 *
10 * Unless required by applicable law or agreed to in writing, software
11 * distributed under the License is distributed on an "AS IS" BASIS,
12 * WITHOUT WARRANTIES OR CONDITIONS OF ANY KIND, either express or implied.
13 * See the License for the specific language governing permissions and
14 * limitations under the License.
15 * =============================================================================
16 */
17
18import * as tf from '@tensorflow/tfjs';
19import * as tfd from '@tensorflow/tfjs-data';
20
21import {ControllerDataset} from './controller_dataset';
22import * as ui from './ui';
23
24// The number of classes we want to predict. In this example, we will be
25// predicting 4 classes for up, down, left, and right.
26const NUM_CLASSES = 4;
27
28// A webcam iterator that generates Tensors from the images from the webcam.
29let webcam;
30
31// The dataset object where we will store activations.
32const controllerDataset = new ControllerDataset(NUM_CLASSES);
33
34let truncatedMobileNet;
35let model;
36
37// Loads mobilenet and returns a model that returns the internal activation
38// we'll use as input to our classifier model.
39async function loadTruncatedMobileNet() {
40  const mobilenet = await tf.loadLayersModel(
41      'https://storage.googleapis.com/tfjs-models/tfjs/mobilenet_v1_0.25_224/model.json');
42
43  // Return a model that outputs an internal activation.
44  const layer = mobilenet.getLayer('conv_pw_13_relu');
45  return tf.model({inputs: mobilenet.inputs, outputs: layer.output});
46}
47
48// When the UI buttons are pressed, read a frame from the webcam and associate
49// it with the class label given by the button. up, down, left, right are
50// labels 0, 1, 2, 3 respectively.
51ui.setExampleHandler(async label => {
52  let img = await getImage();
53
54  controllerDataset.addExample(truncatedMobileNet.predict(img), label);
55
56  // Draw the preview thumbnail.
57  ui.drawThumb(img, label);
58  img.dispose();
59})
60
61/**
62 * Sets up and trains the classifier.
63 */
64async function train() {
65  if (controllerDataset.xs == null) {
66    throw new Error('Add some examples before training!');
67  }
68
69  // Creates a 2-layer fully connected model. By creating a separate model,
70  // rather than adding layers to the mobilenet model, we "freeze" the weights
71  // of the mobilenet model, and only train weights from the new model.
72  model = tf.sequential({
73    layers: [
74      // Flattens the input to a vector so we can use it in a dense layer. While
75      // technically a layer, this only performs a reshape (and has no training
76      // parameters).
77      tf.layers.flatten(
78          {inputShape: truncatedMobileNet.outputs[0].shape.slice(1)}),
79      // Layer 1.
80      tf.layers.dense({
81        units: ui.getDenseUnits(),
82        activation: 'relu',
83        kernelInitializer: 'varianceScaling',
84        useBias: true
85      }),
86      // Layer 2. The number of units of the last layer should correspond
87      // to the number of classes we want to predict.
88      tf.layers.dense({
89        units: NUM_CLASSES,
90        kernelInitializer: 'varianceScaling',
91        useBias: false,
92        activation: 'softmax'
93      })
94    ]
95  });
96
97  // Creates the optimizers which drives training of the model.
98  const optimizer = tf.train.adam(ui.getLearningRate());
99  // We use categoricalCrossentropy which is the loss function we use for
100  // categorical classification which measures the error between our predicted
101  // probability distribution over classes (probability that an input is of each
102  // class), versus the label (100% probability in the true class)>
103  model.compile({optimizer: optimizer, loss: 'categoricalCrossentropy'});
104
105  // We parameterize batch size as a fraction of the entire dataset because the
106  // number of examples that are collected depends on how many examples the user
107  // collects. This allows us to have a flexible batch size.
108  const batchSize =
109      Math.floor(controllerDataset.xs.shape[0] * ui.getBatchSizeFraction());
110  if (!(batchSize > 0)) {
111    throw new Error(
112        `Batch size is 0 or NaN. Please choose a non-zero fraction.`);
113  }
114
115  // Train the model! Model.fit() will shuffle xs & ys so we don't have to.
116  model.fit(controllerDataset.xs, controllerDataset.ys, {
117    batchSize,
118    epochs: ui.getEpochs(),
119    callbacks: {
120      onBatchEnd: async (batch, logs) => {
121        ui.trainStatus('Loss: ' + logs.loss.toFixed(5));
122      }
123    }
124  });
125}
126
127let isPredicting = false;
128
129async function predict() {
130  ui.isPredicting();
131  while (isPredicting) {
132    // Capture the frame from the webcam.
133    const img = await getImage();
134
135    // Make a prediction through mobilenet, getting the internal activation of
136    // the mobilenet model, i.e., "embeddings" of the input images.
137    const embeddings = truncatedMobileNet.predict(img);
138
139    // Make a prediction through our newly-trained model using the embeddings
140    // from mobilenet as input.
141    const predictions = model.predict(embeddings);
142
143    // Returns the index with the maximum probability. This number corresponds
144    // to the class the model thinks is the most probable given the input.
145    const predictedClass = predictions.as1D().argMax();
146    const classId = (await predictedClass.data())[0];
147    img.dispose();
148
149    ui.predictClass(classId);
150    await tf.nextFrame();
151  }
152  ui.donePredicting();
153}
154
155/**
156 * Captures a frame from the webcam and normalizes it between -1 and 1.
157 * Returns a batched image (1-element batch) of shape [1, w, h, c].
158 */
159async function getImage() {
160  const img = await webcam.capture();
161  const processedImg =
162      tf.tidy(() => img.expandDims(0).toFloat().div(127).sub(1));
163  img.dispose();
164  return processedImg;
165}
166
167document.getElementById('train').addEventListener('click', async () => {
168  ui.trainStatus('Training...');
169  await tf.nextFrame();
170  await tf.nextFrame();
171  isPredicting = false;
172  train();
173});
174document.getElementById('predict').addEventListener('click', () => {
175  ui.startPacman();
176  isPredicting = true;
177  predict();
178});
179
180async function init() {
181  try {
182    webcam = await tfd.webcam(document.getElementById('webcam'));
183  } catch (e) {
184    console.log(e);
185    document.getElementById('no-webcam').style.display = 'block';
186  }
187  truncatedMobileNet = await loadTruncatedMobileNet();
188
189  ui.init();
190
191  // Warm up the model. This uploads weights to the GPU and compiles the WebGL
192  // programs so the first time we collect data from the webcam it will be
193  // quick.
194  const screenShot = await webcam.capture();
195  truncatedMobileNet.predict(screenShot.expandDims(0));
196  screenShot.dispose();
197}
198
199// Initialize the application.
200init();
در نهایت، قطعه کدهای مرتبط با پیادهسازی «واسط گرافیکی» (User Interface) جهت اجرای مدل یادگیری ماشین و کنترل بازی PAC-MAN نمایش داده خواهد شد.
1/**
2 * @license
3 * Copyright 2018 Google LLC. All Rights Reserved.
4 * Licensed under the Apache License, Version 2.0 (the "License");
5 * you may not use this file except in compliance with the License.
6 * You may obtain a copy of the License at
7 *
8 * http://www.apache.org/licenses/LICENSE-2.0
9 *
10 * Unless required by applicable law or agreed to in writing, software
11 * distributed under the License is distributed on an "AS IS" BASIS,
12 * WITHOUT WARRANTIES OR CONDITIONS OF ANY KIND, either express or implied.
13 * See the License for the specific language governing permissions and
14 * limitations under the License.
15 * =============================================================================
16 */
17import * as tf from '@tensorflow/tfjs';
18
19const CONTROLS = ['up', 'down', 'left', 'right'];
20const CONTROL_CODES = [38, 40, 37, 39];
21
22export function init() {
23  document.getElementById('controller').style.display = '';
24  statusElement.style.display = 'none';
25}
26
27const trainStatusElement = document.getElementById('train-status');
28
29// Set hyper params from UI values.
30const learningRateElement = document.getElementById('learningRate');
31export const getLearningRate = () => +learningRateElement.value;
32
33const batchSizeFractionElement = document.getElementById('batchSizeFraction');
34export const getBatchSizeFraction = () => +batchSizeFractionElement.value;
35
36const epochsElement = document.getElementById('epochs');
37export const getEpochs = () => +epochsElement.value;
38
39const denseUnitsElement = document.getElementById('dense-units');
40export const getDenseUnits = () => +denseUnitsElement.value;
41const statusElement = document.getElementById('status');
42
43export function startPacman() {
44  google.pacman.startGameplay();
45}
46
47export function predictClass(classId) {
48  google.pacman.keyPressed(CONTROL_CODES[classId]);
49  document.body.setAttribute('data-active', CONTROLS[classId]);
50}
51
52export function isPredicting() {
53  statusElement.style.visibility = 'visible';
54}
55export function donePredicting() {
56  statusElement.style.visibility = 'hidden';
57}
58export function trainStatus(status) {
59  trainStatusElement.innerText = status;
60}
61
62export let addExampleHandler;
63export function setExampleHandler(handler) {
64  addExampleHandler = handler;
65}
66let mouseDown = false;
67const totals = [0, 0, 0, 0];
68
69const upButton = document.getElementById('up');
70const downButton = document.getElementById('down');
71const leftButton = document.getElementById('left');
72const rightButton = document.getElementById('right');
73
74const thumbDisplayed = {};
75
76async function handler(label) {
77  mouseDown = true;
78  const className = CONTROLS[label];
79  const button = document.getElementById(className);
80  const total = document.getElementById(className + '-total');
81  while (mouseDown) {
82    addExampleHandler(label);
83    document.body.setAttribute('data-active', CONTROLS[label]);
84    total.innerText = ++totals[label];
85    await tf.nextFrame();
86  }
87  document.body.removeAttribute('data-active');
88}
89
90upButton.addEventListener('mousedown', () => handler(0));
91upButton.addEventListener('mouseup', () => mouseDown = false);
92
93downButton.addEventListener('mousedown', () => handler(1));
94downButton.addEventListener('mouseup', () => mouseDown = false);
95
96leftButton.addEventListener('mousedown', () => handler(2));
97leftButton.addEventListener('mouseup', () => mouseDown = false);
98
99rightButton.addEventListener('mousedown', () => handler(3));
100rightButton.addEventListener('mouseup', () => mouseDown = false);
101
102export function drawThumb(img, label) {
103  if (thumbDisplayed[label] == null) {
104    const thumbCanvas = document.getElementById(CONTROLS[label] + '-thumb');
105    draw(img, thumbCanvas);
106  }
107}
108
109export function draw(image, canvas) {
110  const [width, height] = [224, 224];
111  const ctx = canvas.getContext('2d');
112  const imageData = new ImageData(width, height);
113  const data = image.dataSync();
114  for (let i = 0; i < height * width; ++i) {
115    const j = i * 4;
116    imageData.data[j + 0] = (data[i * 3 + 0] + 1) * 127;
117    imageData.data[j + 1] = (data[i * 3 + 1] + 1) * 127;
118    imageData.data[j + 2] = (data[i * 3 + 2] + 1) * 127;
119    imageData.data[j + 3] = 255;
120  }
121  ctx.putImageData(imageData, 0, 0);
122}قطعهکدهای نمایش داده شده، تنها بخشی از کدهای لازم برای آموزش مدل یادگیری ماشین و کنترل بازی PAC-MAN توسط وبکم و تکنیکهای بینایی کامپیوتر است. به عبارت دیگر، تنها کدهای زبان جاوا اسکریپت در این بخش نمایش داده شده است. قطعه کدهای لازم برای طراحی صفحه وب و کدهای مورد نیاز برای نمونهسازی یا قالبسازی محتویات، در این مطلب نمایش داده نشده است. برای مشاهده مجموعه کامل کدهای لازم برای پیادهسازی مثال بازی PAC-MAN و دانلود آنها، به لینک [+] مراجعه کنید.
کتابخانه یادگیری ماشین در جاوا اسکریپت (TensorFlow.js)، یک واسط برنامهنویسی کاربردی سطح پایین (که پیش از این با نام deeplearn.js شناخته میشد) را نیز شامل میشود. همچنین، کتابخانه یادگیری ماشین در جاوا اسکریپت از الگوی کد نویسی «اجرای مشتاقانه» (Eager Execution) نیز پشتیبانی میکند.
الگوی کد نویسی اجرای مشتاقانه، یک «واسط دستوری» (Imperative Interface) برای کتابخانه TensorFlow تعریف میکند؛ الگوی کد نویسی اجرای مشتاقانه، کد نویسی TensorFlow در زبان جاوا اسکریپت را سادهتر و زمان اجرای کدها را به شدت کاهش میدهد. به عنوان نمونه، قطعه کد زیر برای انجام یک عمل محاسباتی ساده در TensorFlow میتواند مورد استفاده قرار بگیرد:
1x = tf.placeholder(tf.float32, shape=[1, 1])
2m = tf.matmul(x, x)
3
4with tf.Session() as sess:
5  print(sess.run(m, feed_dict={x: [[2.]]}))
6
7# Will print [[4.]]
با استفاده از الگوی کد نویسی اجرای مشتاقانه، قطعه کد بالا به فرم ساده زیر تبدیل میشود:
1x = [[2.]]
2m = tf.matmul(x, x)
3
4print(m)
وجه شباهت TensorFlow.js و deeplearn.js
کتابخانه TensorFlow.js، که به عنوان اکوسیستمی از ابزارهای زبان جاوا اسکریپت برای یادگیری ماشین محسوب میشود، جانشین deeplearn.js محسوب و هماکنون، با نام TensorFlow.js Core شناخته میشود.
همچنین، کتابخانه TensorFlow.js یک واسط برنامهنویسی کاربردی لایهها (Layers API) را نیز شامل میشود که یک کتابخانه سطح بالاتر برای ساختن مدلهای یادگیری ماشین محسوب میشود. این واسط برنامهنویسی کاربردی لایهها از TensorFlow.js Core و دیگر ابزارها برای «پورت کردن» (Porting) خودکار مدلهای ذخیره شده TensorFlow و مدلهای hdf5 کتابخانه Keras استفاده میکند.
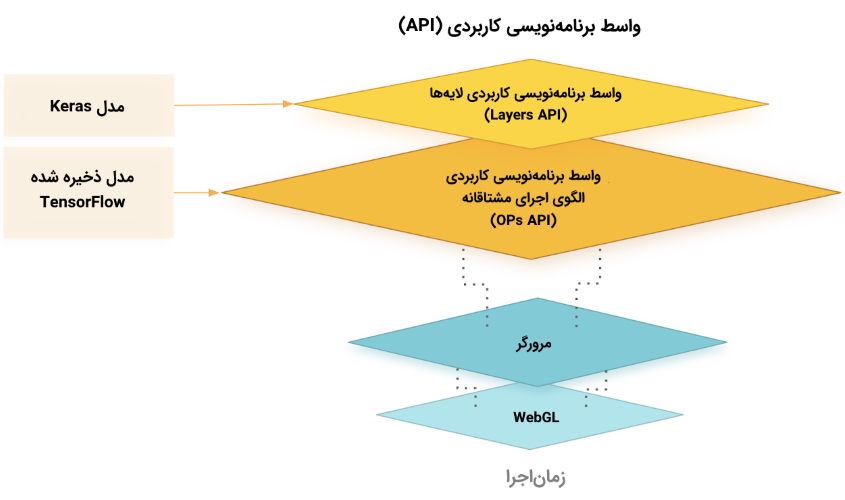
کتابخانه TensorFlow.js، از کتابخانه WebGL برای ارائه بسیاری از قابلیتهای خود به برنامهنویسان و توسعهدهندگان استفاده میکند. این کتابخانه، یک واسط برنامهنویسی کاربردی سطح بالا برای لایههای برنامهنویسی، جهت طراحی مدلهای یادگیری ماشین و یک واسط برنامهنویسی کاربردی سطح پایین، برای «جبر خطی» (Linear Algebra) و «مشتقگیری یا دیفرانسیلگیری خودکار» (Automatic Differentiation) فراهم میکند.
در حال حاضر، در کتابخانه TensorFlow.js، امکان import کردن مدلهای ذخیره شده TensorFlow و مدلهای Keras، برای برنامهنویسان و توسعهدهندگان جاوا اسکریپت فراهم شده است.
اگر نوشته بالا برای شما مفید بوده است، آموزشهای زیر نیز به شما پیشنهاد میشوند:
- مجموعه آموزشهای دادهکاوی و یادگیری ماشین
- مجموعه آموزشهای برنامهنویسی جاوا اسکریپت
- آموزش اصول و روشهای دادهکاوی (Data Mining)
- مجموعه آموزشهای هوش مصنوعی
- پرسپترون چند لایه در پایتون — راهنمای کاربردی
- نقشه دانش فناوریهای هوش مصنوعی و دسته بندی آنها — راهنمای جامع
- کد نویسی شبکه های عصبی مصنوعی چند لایه در پایتون — راهنمای کامل
- یادگیری عمیق (Deep Learning) با پایتون — به زبان ساده
^^



سلام با توجه به تحریم بودن میشه از کتابخانه تنسور فلو استفاده کرد؟؟